
You’ll adore Hostinger if you’re searching for the best VPS hosting options. Discover Hostinger VPS setup tutorial, With eight VPS plans available from Hostinger, you have many options when it comes to dedicated server hosting. It has several virtual private servers (VPS) spread around the US, UK, Singapore, Lithuania, Brazil, and the Netherlands to provide you with close servers and the best website performance. You may also add extra remote NFS space to your server and access files using its Network File System (NFS).
Hostinger VPS setup tutorial
Popular web hosting provider Hostinger is renowned for its user-friendly interface and cost-effective hosting options. It provides cloud hosting, website hosting, domain registration, and other services to assist people and companies in efficiently managing their online presence.
It’s important to know exactly what you’re receiving when looking at a web hosting service or Hostinger VPS setup tutorial, especially if you’re considering a VPS hosting option.
Hostinger is one of the most reasonably priced shared hosting companies on the market and is well-known for its cost-effective services. With its distinctive cPanel, 99.9% uptime guarantee, and worldwide services with little latency, this cost-effective supplier is a top choice for countless novices.
What about Hostinger VPS, though?
In this post, we’ll delve into the specifics of what makes Hostinger VPS so good—or so bad—for your website and look at several top-notch Hostinger VPS hosting substitutes. Let’s start to find out how easy it is to sign up for a cloud virtual private server (VPS) at Hostinger, one of the best hosting companies. Deploy a server and finish its initial setup quickly by following our easy-to-follow instructions.
- Register for an account
Open your Hostinger account and log in. If you don’t already have an account with Hostinger, create one now.
Click the VPS option as indicated by the image below after logging in.

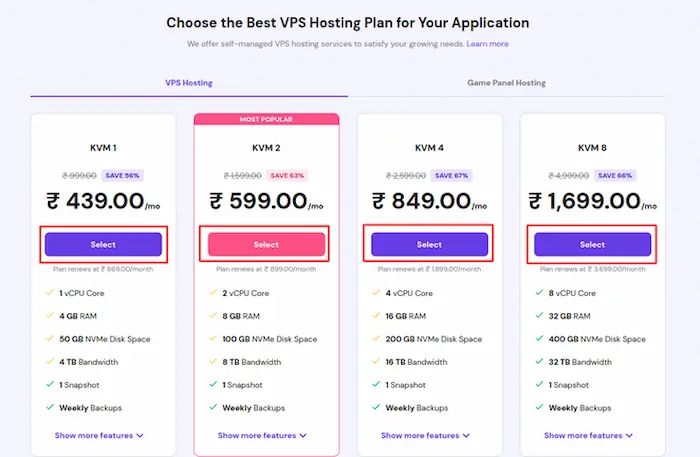
- Choose the strategy
After that, you’ll find a range of options with different VPS hosting specifications. Choose the option that closely matches your needs in Hostinger VPS tutorial, which you can take advantage of the offers offered by using the link here
A minimum of 2-4 GB of RAM is needed to host WordPress. Depending on the amount of your media assets, themes, and plugins, you require at least 20–50 GB of storage space. You can pick a different plan with a greater configuration based on your needs and use.
- Finish Making Your Purchase
You must now go ahead and finish paying for your VPS plan. This is an important step in the Hostinger VPS setup tutorial.

- The Hostinger VPS setup tutorial needs to Begin by configuring
You will be sent to the page where you can start configuring your VPS when the payment has been completed. To continue, select the Start Now option.

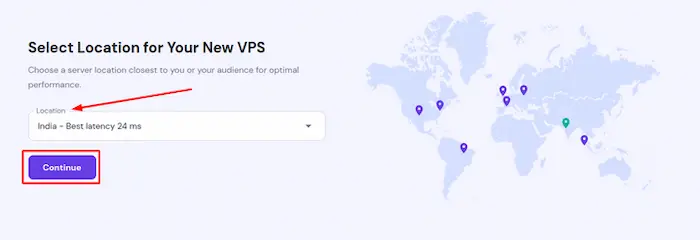
- Choose a Location
The next step is to decide where your server will be located. Hostinger offers many locations for virtual private server setup.
Generally speaking, you want to choose the area that is closest to your target demographic. Because of the decreased latency, your website will load more quickly for the bulk of your visitors.
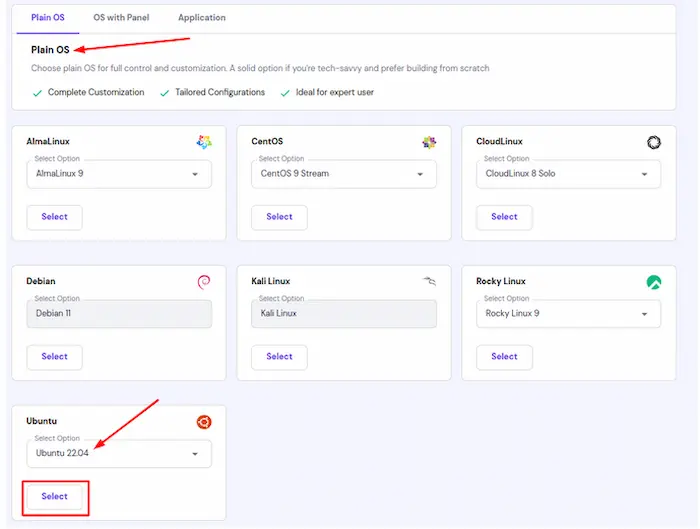
- Choose an Operating System
You must choose the operating system for your server at this phase. Ubuntu 20.04 LTS x64 or Ubuntu 22.04 LTS x64 are the versions we advise using.
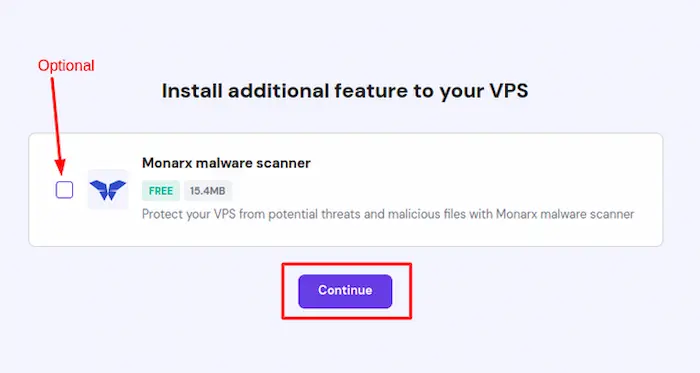
- Including an Optional Extra Feature
Installing an additional feature on your VPS is your next choice. By checking the corresponding checkbox, you may activate the malware scanning.
If you would like to add this step, check the box and press the Proceed button.
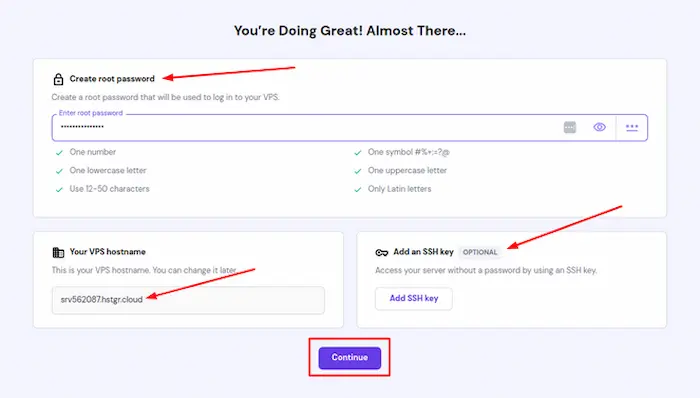
- Method of Login
The next step is to assign a hostname and specify a root password for your virtual private server. An optional SSH Key can also be added. Click Continue after completing these instructions.
Hostinger VPS
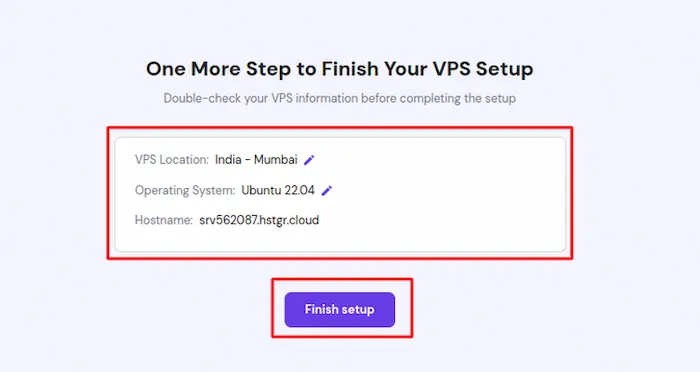
- Confirm Specifics
You have to confirm the VPS details in the final stage of this procedure. To finish the setting procedure, select the Finish setting option.
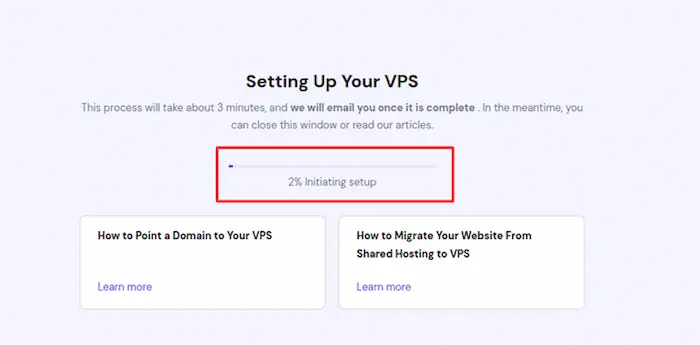
You may see the Initiating Setup procedure as seen in the image below after selecting the Finish Setup button.
- Accessing SSH keys and managing virtual private servers
After everything is set up, you can administer your VPS from its Custom Dashboard by selecting the administrator VPS option. You will also be able to access servers via Terminal thanks to the SSH Access option.

Hostinger VPS setup tutorial Well done! After successfully creating your Hostinger VPS, it is now prepared to establish a connection.
How to Set Up Hostinger’s WordPress VPS Server
With the Hostinger VPS setup tutorial, follow these steps to finish setting up a virtual private server, obtaining a domain name, and purchasing a VPS hosting plan:
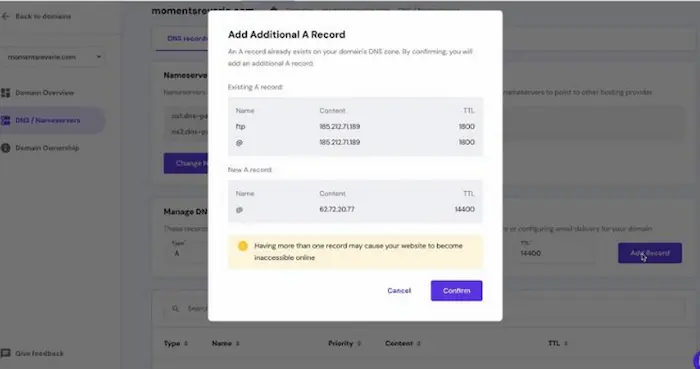
- Using a VPS to Point Your Domain:
- Navigate to your Hostinger panel’s DNS settings.
- Records should be deleted and replaced with new ones referring to your VPS IP address. Making your website available via your domain requires completing this step.
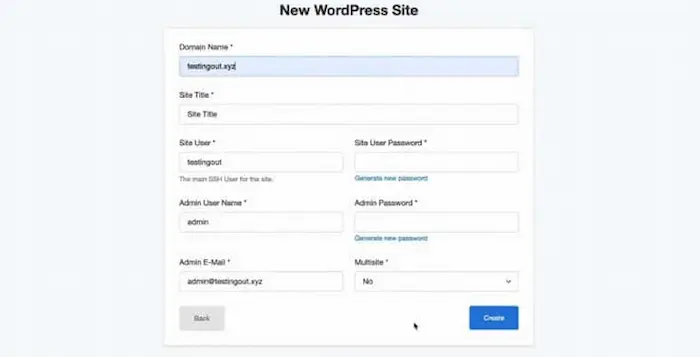
- WordPress installation on the VPS:
- Enter your credentials to access your control panel.
- To begin creating a WordPress website, click “Add Site.”
- Save your credentials after completing the relevant fields.
- Install an SSL certificate to secure data sent between visitors and your website.
- Select a Topic:
- Go to the admin dashboard of WordPress.
- Navigate to Themes under Appearance.
- Choose a responsive theme that complements your logo. Astra is a well-liked option because of its adaptability.
- Install and turn on the theme of your choice.

- Install Plugins on WordPress:
- Open your WordPress dashboard and select Plugins.
- Install and enable the necessary plugins for site customization, analytics, caching, security, SEO, and e-commerce.
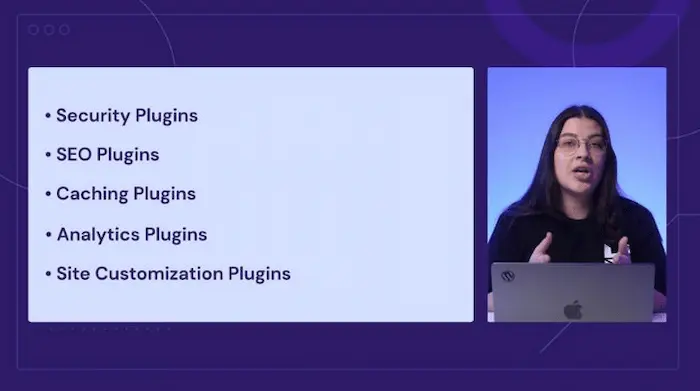
Remember that a website that has too many plugins installed may load slowly.
- Personalize the Look of Your Website:
- Go to Appearance > Customize from there.
- Modify the global color scheme and typography to complement your identity.
- Make sure your photographs are optimized for the web and utilize high-quality ones.
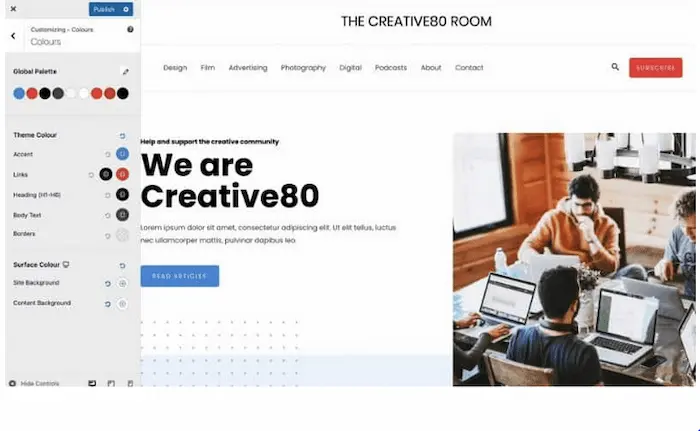
Advice: Choosing a consistent typeface and color scheme improves readability and user experience.
- Make Posts and Pages:
- Create the necessary pages, such as Contact, About, and Home.
- If necessary, create a blog page.
- Add pertinent text, pictures, and videos to these pages.
- To gather leads, add a WordPress plugin for contact forms.
- Post an interesting and well-written first blog entry.

- Protect Your Website:
- Put in place robust authentication procedures.
- Install security plugins for malware detection and firewall protection, such as Word fence.
- Update WordPress core, plugins, and themes often to ensure security.

- Publicize Your Website:
- Use a range of browsers and devices to test your website. Verify timeliness and correctness of content.
- Announce the launch of your website whenever it makes you happy.
- As your website expands, you may upgrade your VPS package.
In conclusion, a Hostinger VPS setup tutorial, thorough preparation, and execution are required when setting up a WordPress VPS server with Hostinger. Choosing the right hosting plan and keeping your website secure are crucial for a successful online presence. Recall that your adventure with your website is only getting started. Growth requires high-quality material and frequent updates.
Read more: What are The Requirements for Registering a New Domain with Hostinger?
Hostinger VPS Hosting Types
At the Hostinger VPS setup tutorial, Let’s examine Hostinger’s plans and some of its standout characteristics. First off, compared to conventional HDDs, Hostinger’s SSD storage significantly speeds up website loading times.
Additionally, Hostinger’s free SSL certificate guarantees that all data carried over your site is secured and protected whether you operate an eCommerce store or any website that handles sensitive data.
The user-friendly dashboard of Hostinger’s plans is another noteworthy feature. Managing your server is made easy by its user-friendly architecture, which provides immediate access to all required tools in one location. Additionally, every Hostinger virtual private server has a dedicated IP address and is safe. The three Hostinger VPS types are described as follows:
- VPS for Linux
The first stage, Linux VPS hosting, comes in several packages tailored to suit the various requirements of websites. Eight programs are available for you to select from based on the size and budget of your business. Even beginners may utilize it because of its simplicity of usage.
All the plans come with many benefits, including full root access, dedicated IPs, and weekly backups.
- VPS for CyberPanel
Powered by Litespeed, CyberPanel VPS provides a control panel that is quicker, more secure, and more effective. Every plan includes free SSL and HTTP support, weekly backups, complete root access, and a dedicated IP.
For those who are looking for speed, CyberPanel is a great option. There are eight alternatives available to you.
- Hosting of Minecraft Servers
The Minecraft Server package from Hostinger is the ideal option for players who wish to build their own virtual universe. Installing modifications and plugins, having complete administrative control over your server, and playing online multiplayer games with friends without any lag or downtime are all possible with this package.
Top-tier hardware and limitless bandwidth are provided by Hostinger to provide the best possible gaming experience.
- Assistance from mods.
- Total access to the root.
- DDoS defense.
- PCI-DSS compliant.
- Automatic backups off-site.
- Uptime of 99.99 percent.
With Hostinger’s VPS hosting, running a Minecraft server on a personal computer may be cost-effective even if it demands a lot of processing power.
Aside from the smooth service that a Hostinger Minecraft Server plan offers, customers who invest in it will also receive complete confidentiality, as guaranteed by the company’s security protocols.
These protocols include IPV6 support connectivity across multiple devices, which guarantees safe browsing while playing games hosted by Hostinger.
Read more: The Importance of Domains and Online Stores for a Successful Website
Why We Appreciate Hostinger VPS?
Surely, when you search for a Hostinger VPS setup tutorial, this question may think for:
Reasonably priced
VPS hosting plans from Hostinger are renowned for being reasonably priced; occasionally, they are even less expensive than shared hosting packages. Because of this, they are a desirable alternative for people who want to go from shared hosting without going over budget.
Numerous OS Options
Supporting a variety of Linux operating systems, including:
- Ubuntu
- CentOS
- Debian
- AlmaLinux
- RockyLinux
Hostinger provides diversity. You may choose your operating system and operate in a setting that suits you.
Control and Customizability
Even if you are paying for an unmanaged virtual private server (VPS), Hostinger offers you support. In addition to popular control panels like cPanel, DirectAdmin, Easypanel, Webuzo, Plesk, and CyberPanel, they provide pre-built server setup templates.
This makes the setup procedure easier and facilitates a speedy start.
Features of Security
Entire Hostinger VPS plans come with strong security features like firewalls and DDoS defense. To further safeguard their data and apps, users may also create their own firewall rules.
Integrated AI Helper
An integrated AI assistant is included with all of Hostinger’s VPS services, helping to automate and manage repetitive chores and improve server management. Although this is a differentiator, it may seem a little outdated given that ChatGPT is already free for all users. With OpenAI, you can almost create the same functionality on your own for free.
Read more: How to Choose a Web Host – Web Hosting Guide
What isn’t That Good?
When looking at Hostinger VPS setup tutorial you have to look at the negatives as much as you look at the positives:
Inadequate Management of Hosting
The fact that Hostinger VPS is unmanaged is a major disadvantage.
This implies that you are in charge of managing the server in every way, including updating, applying security patches, and troubleshooting. This can be a difficult and time-consuming obligation for those who lack technical knowledge or who would rather not do these duties.
Restricted Scalability
Although Hostinger provides several VPS plans with different features, if your websites or apps expand quickly, you may discover that your alternatives are limited. There are just four plans to choose from, and the maximum scaling capacity is 8 virtual CPUs and 400GB of NVMe storage. Companies that need a lot of flexibility may need to search for alternatives that offer more adaptable choices for allocating resources and growing.
Support Restrictions
Even though it provides some assistance, the integrated AI Assistant cannot take the place of a technical support agent’s knowledge.
When complicated problems occur, customers may find the available support alternatives inadequate in comparison to fully managed VPS services, where the supplier provides extensive support and debugging help.
Hostinger VPS Setup Tutorial and Overall Dependability: Security and Performance
You can count on great performance levels from Hostinger; you’ll have dedicated server resources, so you won’t have to worry about the performance of other people’s websites interfering with yours.
The supplier maintains several data centers throughout the globe, including those in:
- Singapore
- United States
- United Kingdom
- Netherlands
- Lithuania
It is possible to select a server that is near your intended audience, guarantee optimal dependability, and minimize latency. You’ll also receive Network File System functionality as a bonus, allowing you to bypass location restrictions and access all files over the NFS.
Moreover, Hostinger provides enough processing power for medium- to large-scale projects by using the newest Intel Xeon processors, 512 GB RAM, and terabytes of NVMe SSD storage for every VPS.
Nonetheless, because shared hosting is more affordable and user-friendly, it can be a better option for bloggers, startups, or anybody with a tiny website.
Take note:
Notably, NVMe technology is significantly more sophisticated than conventional SSD technology; it is quicker and has superior encryption.
A 99.9% server uptime guarantee is another perk for customers like you, so you won’t have to worry about unplanned outages. In essence, an inaccessible website is unable to carry out its primary function—that is, it cannot allow users to access your material, which is detrimental in every way.
A dedicated IP address, full-stack server protection, integrated sophisticated DDoS protection, automated backups, and manual live snapshots—which come in useful if your site goes down and you need to recover the content—are all included in the security package.
Read more: 5 Ways On How To Take Control Of Your Content Marketing
Hostinger VPS setup tutorial and Customer Service
As a self-managed VPS, you will be responsible for maintaining your server. Thankfully, a user-friendly interface that makes server management simpler will be to your advantage. You may also explore Hostinger VPS setup tutorial-related topic, including setting up WordPress websites on VPS and administering your VPS.
Moreover, you may email or use live chat to reach Hostinger’s support staff around the clock with any general inquiries. The Priority Support add-on is also available through the dashboard’s Store.
Commonly Asked Questions about Hostinger VPS Setup Tutorial
What is a self-managed VPS?
Like a shared hosting plan, all technical elements are taken care of by the provider with a managed VPS. With a self-managed service, you, in turn, take full responsibility for setting up and overseeing your server. In this case, the host’s only duty is to maintain the network and hardware operating.
Is it simple to create a VPS account with Hostinger?
Easy, after all, is subjective, isn’t it? If you know what you’re searching for, the actual sign-up procedure is rather easy. Sure, everything is easy to understand if you know exactly which management panel and type of server you want to try.
No, if all you want is for someone to set up your server for you, so all you have to do is upload your website and go. The semi-managed VPS from Hostinger isn’t the greatest choice for that.
Does Hostinger provide customer assistance for its VPS plans that are self-managed?
Indeed. For self-help, you may access its extensive knowledge base. For basic questions, you can email or use live chat to reach the support staff around the clock.
Read more: Types of Web Hosting Services
What distinguishes VPS hosting from shared hosting?
There are principally two advantages. First off, dedicated, guaranteed hardware resources are often included with VPS servers. If another person’s VPS site has excessive traffic and is hosted on the same physical server as yours, it is their issue and just their issue. VPS hosting is typically more stable and dependable because no one else’s website will cause yours to load more slowly.
Furthermore, the security of your website is distinct from that of other websites running on the same hardware. You don’t get hacked if they do. Your VPS is unaffected by what happens to another VPS as long as it is maintained safe and up to date.
The main purpose of a VPS is this separation of concerns.
Is the Hostinger VPS secure?
Yes, you are entitled to the best possible security and safety. A dedicated IPv6 address, BitNinja, sophisticated DDoS protection, automated backups, manual snapshots, and more specially designed tools for keeping an eye on and protecting the infrastructure are all included with every VPS.
Can Hostinger provide fast speeds?
To provide blazing-fast speeds, Hostinger makes use of several data centers across the world as well as cutting-edge technology like NVMe SSD storage and Intel Xeon CPUs. Additionally, you’ll benefit from isolated environments with dedicated resources, so you won’t have to worry about other users’ resource use affecting your performance.
Are any Windows VPS options offered by Hostinger?
There aren’t any, sorry. The firm only offers VPS hosting with a Linux operating system. CentOS, Ubuntu, Fedora, Debian, and Suse are the options available to you.
Is there an uptime guarantee available for Hostinger’s VPS plans?
Yes, all VPS hosting plans come with a 99.9% uptime guarantee.
Does the Hostinger VPS setup tutorial provide affordable VPS?
Yes, the VPS service offered by Hostinger is unquestionably inexpensive. However, this is negated by the fact that there are no managed VPS plans available, meaning you’ll have to do a lot of server administration yourself.
Does Hostinger’s VPS package come with a money-back guarantee?
Yes, you have 30 days after purchase to request a complete refund for your VPS web hosting package.
If I’m not computer savvy, can I manage a virtual private server?
Sadly, I haven’t yet discovered a reliable server that offers excellent VPS hosting that is also quite simple. cPanel often offers the easiest options, but it may be quite costly and sluggish, particularly when such VPS packages make use of the Apache web server.
In general, better VPS hosting is more complicated and requires that you know exactly what you want. Kinsta is the only VPS provider that truly simplifies things, as it provides all users with the same technology: WordPress on a reliable server. It is quite pricey, though.
Conclusion of Hostinger VPS setup tutorial
Offering magnificent pricing and robust performance, Hostinger provides shared, cloud, and virtual private server (VPS) services. However, take note of database capacity restrictions on cloud and shared plans as well as the costly option of installing cPanel software to your VPS account; you may avoid this by utilizing the often complicated and inadequately explained Webmin / Virtualmin interface.
A cloud package is an ideal option if you have a WordPress content site and need to handle the greatest traffic at the fastest possible speed. The shared plans might be ideal if all you need is a dependable, affordable plan for hosting a personal or very tiny company website with a modest number of visitors.
For the money, Hostinger’s VPS plans provide the most value and versatility. You may work with massive databases, install your software, and select from a variety of Linux OSes and control panel apps for $4.99 to $19.99 each month, depending on RAM, CPU cores, and storage capacity.
Although the general speed of VPS is not as good as that of the cloud, it is still better than most of the VPS plans we examined, and for expert website builders who don’t want to run into any restrictions, the extra degree of control makes it a superior option.
Just be sure you’re prepared to learn how to utilize Virtualmin or set aside an additional $23 a month for your expenses to have access to cPanel.